Indie Horror Game Starter Kit
Documentation
Scripts
All the scripts used in this project can be found in the “Scripts” folder. The folder is divided into two main parts, the general scripts (located in the root folder), and the item scripts (located in the “Item Scripts” subfolder). The general scripts are mostly unique in that only one instance of them can (and should) be present on the scene at a time. In contrast, item scripts are designed to be non-unique, with each script being potentially attached to multiple objects of the same type. For example, the battery pick-up script is specifically tailored for the battery object on the scene. The script contains the functions which replenish the battery levels of the flashlight. These functions are, in turn, used by the "Interactable" script which is attached to every single such object on the scene. In other words, item scripts are script uniquely trailored for interactable objects on the scene.
Unlike the latter, as previously mentioned, the general scripts like the “Inventory Manager” - are universal and govern the behavior of their corresponding systems. Although these scripts can be modified, only one instance of such scripts will ever exist on the scene. Most of these script instances can be directly accessed by their instance reference from other scripts. This allows us to easily interconnect various systems. For example, if you inspect the aforementioned script, you will find a line of code that looks as follows:
public static InventoryManager instance;
And at the end of the script you like find the following function:
void Awake() { instance = this; }
The first line creates a static reference to an instance of the InventoryManager class, while the latter assigns this reference to be the active object in question. This approach works only if we have a single instance of the script on the scene, and allows us to access this instance (from any other script) as follows:
InventoryManager.instance.SomeFunction();
Where “SomeFunction()” can be a (public) function of a variable.
Here is a quick overview of all the project scripts:
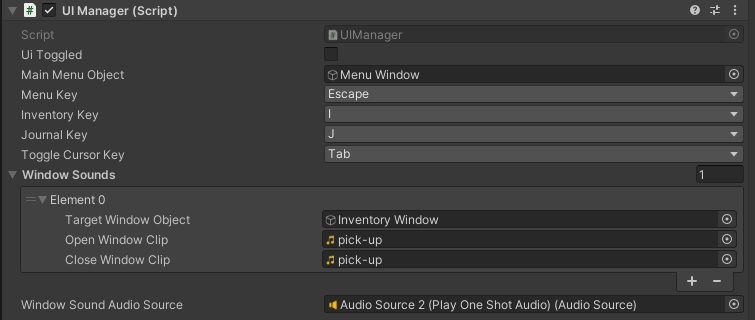
UIManager: This script is responsible for dealing with UI windows. For example, whenever a player wishes to open a window, this is done via the “Toggle Window” function. The latter adds any opened windows into the “UI Windows” list, before eventually opening the window. This is done to keep track of open windows, which, in turn, allows the player to use special keys (like the ESC key) to close the windows one by one, starting from the window opened last.
In addition, the UI manager is interconnected with the “Cursor Manager” script, toggling the UI cursor based on whether any UI windows are open. In other words, if a UI window is opened, the cursor will change to the dedicated UI cursor, allowing the player to click on buttons and interact with the interface.
TextManager: The text manager object governs the behavior of “dialogue” windows. The latter are windows used to display sequences of text. Whenever we want text to be displayed on the screen (besides the notes and pop-ups which have their own dedicated systems), we can utilize special functions such as “Open Dialogue” or “Open Minimal Dialogue”, to display the corresponding text windows. All dialogue options can be configured via the “Linked Text” list, which contains separate lists of dialogue nodes. Nodes are interlinked and each node contains a reference to the next node (if one exists), and detailed configuration (name, text, image, functions to invoke upon reaching the node etc.). Nodes can be linked in any order to create chains of dialogue.
Please note that the difference between the dialogue window and its minimal counterpart, is the UI window which appears when you invoke them. For example, the standard dialogue window is located at the bottom of the screen and contains additional information (e.g. the speaker’s name and image). In contrast, the minimal dialogue window only contains the text itself and is located in the middle of the screen.

PopupManager: The pop-up manager script is responsible for handling various pop-ups. There are three kinds of pop-ups available at the moment: the alerts, quantity selectors, and confirmation pop-ups. Alerts are simply small windows with a single message in them. Quantity pop-ups allow the player to select the quantity of something (for example the quantity of the item they wish to discard). Lastly, confirmation pop-ups facilitate the confirmation of actions (giving the player a pop-up with the “confirm” and “cancel” options. These pop-ups can be fully configured, including the functions that are supposed to be triggered after the player interacts with the pop-up (e.g. invoking a function after the player has pressed the “confirm” button).

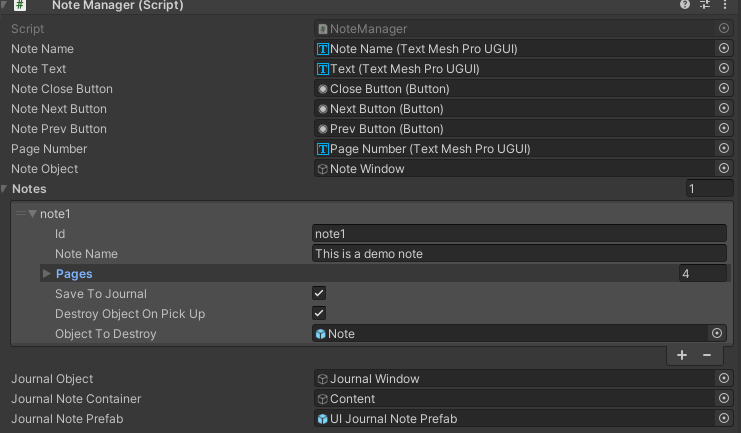
NoteManager: This is the last script amongst the ones that are responsible for displaying text on the screen. The note manager, as the name suggests, is responsible for displaying notes. While playing the game, the player can collect various notes, which can even be stored in the journal for later review (it is possible to configure whether a note will or will not be displayed in the journal). Notes are displayed like pages of text, and the user can change between these pages by clicking on the arrow buttons. Notes can be fully configured via the “Notes” list, and each note can be set up to have any number of pages. Events (functions) can also be triggered upon reaching specified pages. The note manager also handles the “Journal”, which is simply a UI window with all the collected notes listed inside.

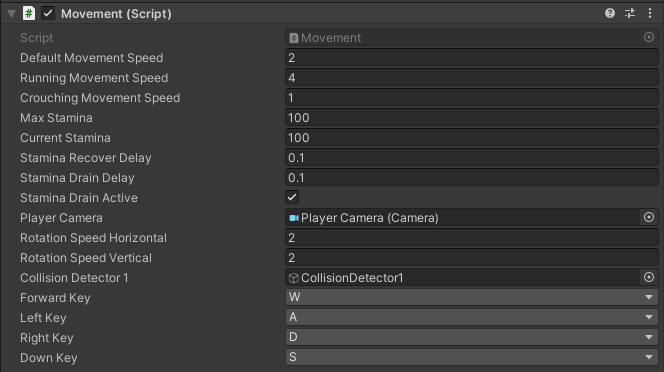
Movement: The movement script handles all the player movement (crouching, walking, and running). This script allows us to set the running, walking, and crouching speed, as well as rotation speed (both horizontal and vertical), stamina consumption, and stamina recovery rate.
Jumping: Separate from the movement script, this script handles jumping. The script allows us to set the jump height, and define the layer-mask of the surfaces that allow jumping on them.
Please ensure that all of the surfaces in your game that allow for jumping are categorized under the static layer specified in the jumping script.

Lightswitch: A script used on light-switches. It lets us toggle a light-source on and off, while also animating the 3D model of the switch. In addition to the lighting, the light-switch script allows us to set custom lamp materials when toggling the lights. For instance, the main lamp on the demo scene uses two separate materials when toggled. The first material is a plain while material used for when the light is turned off, while the second material has been configured to emit light; and is used when the light is turned on.

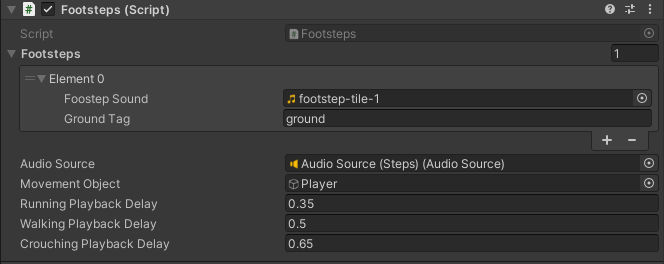
Footsteps: This script is designed to manage the sound coming from footsteps. Using this script we can define different footstep sounds for different surfaces. In addition, we can set the playback speed for the footstep sound, based on whether the player is running, crouching or walking.
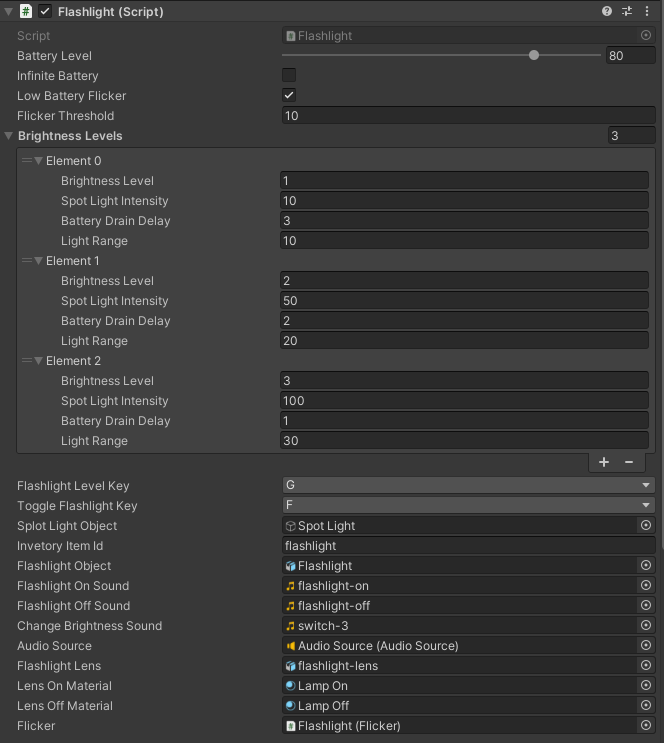
Flashlight: This script allows us to configure the brightness levels of the flashlight, alongside with other parameters. Each brightness level has a battery depletion rate attached to it, as well as the intensity and range of the light at that brightness level. Just like with the light-switch script, this script allows us to assign custom materials on the lens object of the flashlight, depending on whether the light is on or off.
Door: The door script can be attached to objects that are meant to open and close by means of rotation - to manage their states. A door can be either locked or unlocked, and we can define a specific key (from within the inventory items list) for any given door. Doors are also animated, and we can define the rotation angle at which they are either open or closed. Lastly, doors automatically detect the player and will stop moving once the player collides with them. Doors, just like other interactables within the game, can be interacted with using the default interaction key.
Drawer: The Drawer script is identical to the Door script, with the only difference being that it changes the position instead of the rotation of the target object. Just as the name implies, it can be used on objects such as drawers to open and close them.

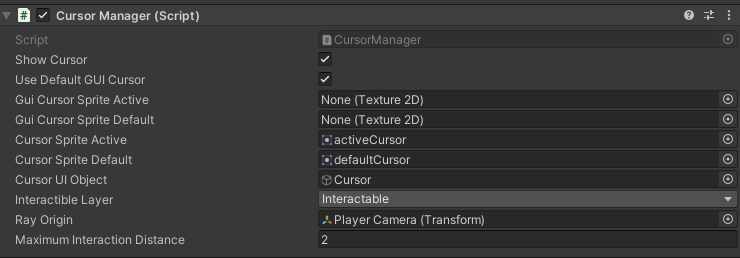
CursorManager: The cursor manager is responsible for all cursor related events. For instance, whenever the player looks at an interactable object, the cursor manager automatically highlights the cursor, and stores that object. If the player decides to interact with the object under the cursor, the stored object will be used to commence the interaction (which is handled separately by the Interaction Manager script). Note that the cursor manager identifies objects as "interactable" only when the object has a collider and has its layer set to "Interactable". Additionally, any interactable object just have the "Inetractable" script attach to it. In addition, the cursor manager also handles the transition between the UI cursor and the in-game static cursor. Lastly, this script also allows us to set the interaction distance for objects. The latter is the max distance between the player and object that allows interaction.
Interactable: This script should be attached to any object that is supposed to be interactable. Please ensure that any objects with this script attached also have a collider attached to them, and are sorted under the "Interactable" layer. This will allow the "Cursor Manager" to detect said objects when the player points at them. Once the player interacts with the object, the functions defined in the “functions to invoke” field of this script will be invoked. For example, the flashlight object invokes the "General Pickup" script when interacted with, adding the flashlight item to the invetory.
Interaction Manager: The interaction manager makes interaction with objects possible by utilizing the “Cursor Manager” and “Interactable” scripts. In addition, this script monitors whether the UI is active, and if so, it disables object interaction to avoid issues. The default interaction key can also be defined in this script.

The Battery Pickup and General Pickup scripts: Each of these scripts is unique and allows the player to interact with the corresponding objects in a different ways. The battery script immediately replenishes the batteries on a flashlight (if one exists in the inventory), while the general script (used on the flashligh alongside with other objects) is used to pick up the flashlight item and add it to the inventory. These scripts also have additional parameters such as the pick-up sound and quantity. Both scripts should be directly attached to the corresponding items. Once attached, the functions inside of them can be invoked via the “Interactable” script, which should also be attached to the item in question.
Shared Methods: This script contains functions shared between multiple item scripts. For example, the “Play Audio Once” function plays an audio-clip once when triggered.

Inventory Item Instance: The script in question is automatically attached to the item prefab in the inventory when generating the list of available items. This script contains information about the item to which the prefab corresponds. This script is used via the "Invetory Manager" script to obtain the information about the item to which the prefab corresponds. It does so by accessing that information directly from an instance of this class.
Key Manager: The key manager script monitors the "cancel" and "confirm" keys. These keys are used in specific UI windows to approve or decline actions. For example, when the player wants to discard an item, the confirmation pop-up will appear. The pop-up has two buttons, “confirm” and “cancel”. Both buttons can be interacted with by using the mouse, but the asset is designed to support keys as well. By default the “E” key is used as the confirmation key while the “X” key is used as the cancelation key (ESC is not used to avoid pressing it by accident). The key manager precisely monitors whether any of these keys are expected to be pressed. If any of the keys were pressed, a special delegate function will be invoked. To properly utilize this script, whenever the user is expected to give input, the “SetConfirmKeyMethod” and “SetCancelKeyMethod” functions should be called in order to define the functions to be triggered when the keys are pressed. The latter is already pre-programmed in the quantity and confirmation windows that can be toggled via the “Popup Manager” script. It should be noted that, by default, once the functions are invoked by pressing the keys in question, the keys are reset to null (meaning that pressing the key again will not invoke the function again). This means that the aforementioned functions ( “SetConfirmKeyMethod” and “SetCancelKeyMethod”) must be called every time in order to re-assign your desired methods to the keys. This can be circumvented by passing the "unsetAfterUse" parameter of the corresponding functions as "false". However, in this case you will need to manually use the "UnsetCancelNow" and "UnsetConfirmNow" functions to unbind the methods from the keys at a later time.

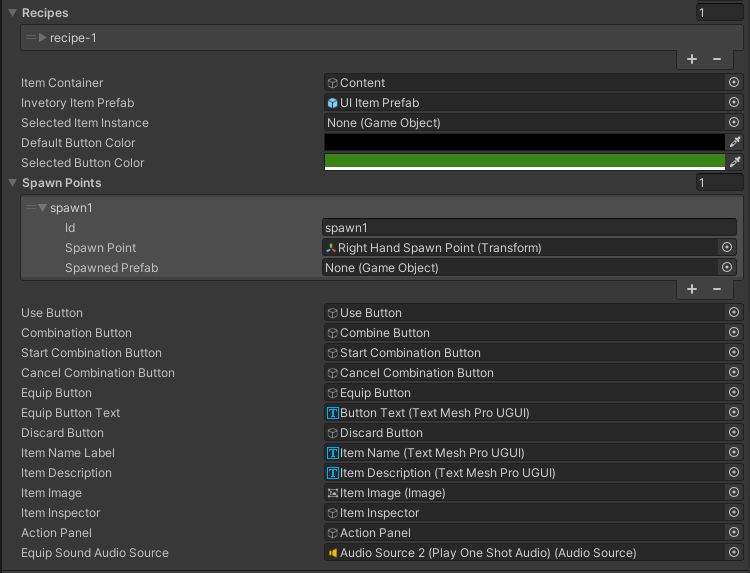
Inventory Manager: The inventory manager is perhaps the central script of this asset since it allows for the management of all in-game items. The script facilitates the creation of items (alongside with a detailed configuration for each item) and recipes. Items consist of various properties such as the item id, name and description. Each item must have an item id, since the latter is required to uniquely identify the item and retrieve its information. Items can also be combined into other items. This can be done by utilizing the item combination system. Possible item combinations can be created as “recipes” which can be configured in a variety of ways. For example, a recipe can either produce one or even multiple items. In addition, we can configure whether we want the source material to be destroyed after the resulting items are created. You can initiate item combination by clicking the “Combine Items” button in the inventory. This will enable two new buttons, the “Combine” and “Cancel” buttons. While item combination is active, you can select any item from the list of available items. Once you have selected the items for combination, you can click the “combine” button to combine them. If this item combination exists within the recipes list, the items will be combined and a new item will be created based on that recipe.
The inventory manager script also has a variety of useful functions. For instance the “Add Item” function will add any number of a specific item to the inventory, while the “Remove Item” function will do the opposite. Lastly, the items can also be equipped or unequipped. This can be also achieved by calling the corresponding functions (or clicking the equip button in the UI if the item is configured as equipable). Equipped items are simply added to the corresponding list, which can then be used by other scripts to detect whether the item has been equipped. For example, the flashlight script detects whether the player has equipped the flashlight before allowing them to use it. Lastly, items can be configured to spawn prefabs on the scene when equipped. To achieve this, we must set up the “spawn points” list, by creating empty game objects as spawn points on the scene, and adding these objects to the list in question as spawn point, alongside with a unique id. These spawn points are then used coordinates to spawn game objects on the scene. The game objects to be spawned can be configured via the corresponding list under each item in the inventory. Each element of said list requires the spawn-point id (assigned to the spawn point in the aforementioned list), and a prefab to be spawned. When the player unquips the item, the spawned prefabs will be destroyed.
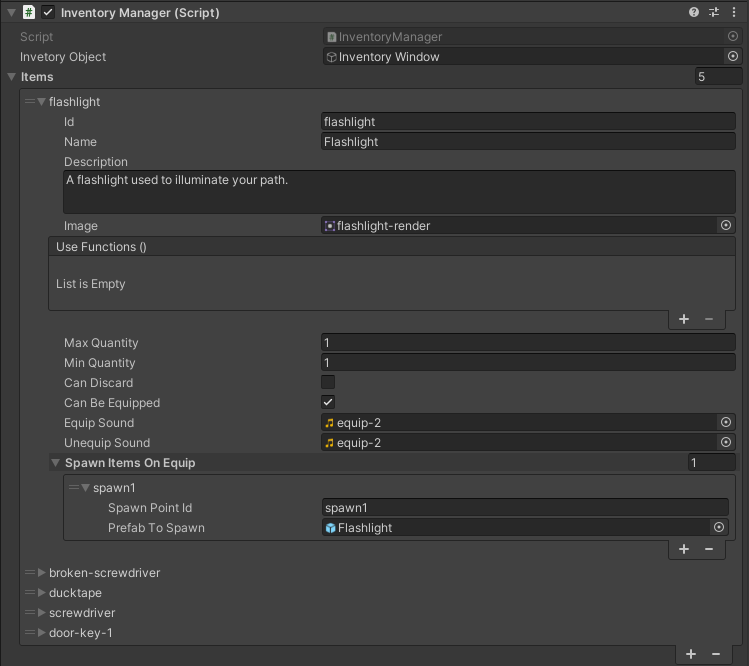
For example, the spawn point containing the flashlight is set up as an empty game object under Player - Player Camera - Right Hand Spawn Point. This spawn point is then used when the player equips the flashlight, width the flashlight prefab (located in the prefabs folder), being spawned underneath.
Stamina Manager: The stamina manager transforms a slider UI object into a stamina bar. It accesses the “Movement” script on the player and updates the slider with the current value of the player’s stamina. If the player’s stamina is full, and the player is not running, the stamina bar object is hidden.
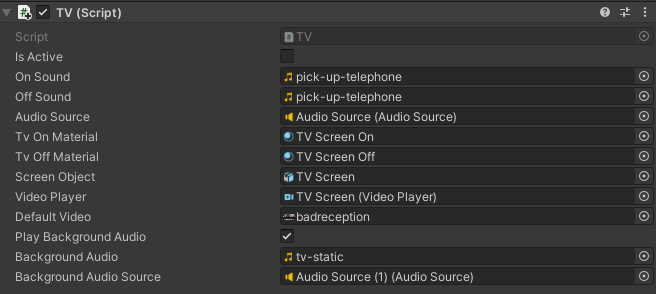
TV: This script works similarly to the light-switch script, in that it allows the player to toggle the TV on and off. The latter involves stopping and resuming video playback, changing the base material of the screen, and playing a corresponding sound when the TV is toggled.
Ceiling Fan Manager: This is a very simple script that rotates the ceiling fan. We can use the “Toggle Fan" function within the script’s instance to toggle the fan on or off. For instance, the fan can be toggled by the light switch on the demo scene, and is turned on by default alongside with the room lights.
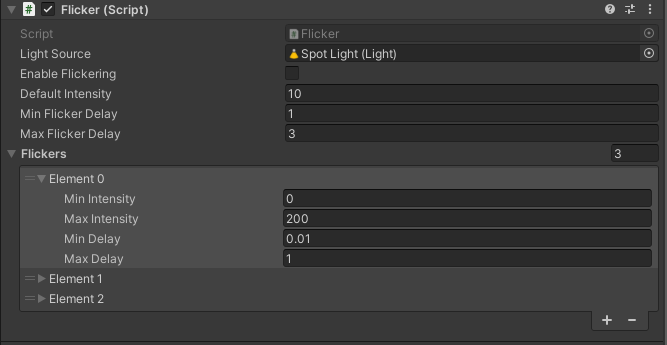
Flicker: This script can be used to make any light source flicker. Using this script, we can set up any number of different flicker levels. Each level can have a random flicker delay range and a random light intensity range. During each "flicker", and random light intensity will be selected, using the defined intensity range. Similarly, a random delay will be selected and used for that flicker.
Trigger Zone: Any object with a trigger collider attached to it can act as a trigger zone. Once the player enters or exits the zone, custom methods can be triggered (either once or repeatedly).
Main Menu Manager: This script contains methods used in the main menu. For instance, the “Exit Game” function closes the client when invoked. By default, this function is attached to the “Exit Game” button in the main menu UI.