Indie Horror Game Starter Kit
Documentation
Components
The demo scene is created as a pre-configured template. The scene itself can be roughly divided into two parts, the game objects and the UI. The game objects consist of the environment, the player, and all the interactable items. Let’s take a closer look at how exactly the scene is set up, and now everything is interconnected.
Game Manager
The game manager object contains scripts which govern most of the in-game systems. There can only be one instance of the latter on the scene, thus they are all attached to the game manager object. These scripts contain the majority of the project’s configuration, including Items, Dialogue, Item Recipes, Notes, Keys, and more. In addition, all the UI windows, buttons, and objects are also assigned via the scripts attached to the game manager object. This means that if you wish to modify the default UI, please make sure that any objects you replace are also replaced in the corresponding scripts under the game manager object (if a reference to the exists). All functional buttons, text fields and images will have a dedicated variable. If you are unsure of the purpose of a field, you can always hover over the field with your mouse to view the tooltip. However, it is highly recommended that you study/explore the related scripts, as this will help you deepen your understanding of the inner workings of the project. All scripts are well-commented and clearly written.
The UI
The UI (user interface) is located under the canvas object. We will take a look at the UI objects one by one:
1) Cursor: This is an artificial in-game cursor. Unlike the standard cursor, this is a UI object positioned in the middle of the screen, and not an actual cursor. By default, when the player is not in a UI menu, this UI object is activated while the default cursor is hidden. This object is utilized by the “Cursor Manager” script, and is only toggled on when the player is not in a UI menu. The cursor can be also toggled using the "Tab" key.
2) Menu Window: This is a simple menu window which appears when the player presses the “ESC” button (which can also be configured). Please note that this window will only appear when no other windows are open. Otherwise, pressing the “ESC” window will only result in closing existing windows (unless we have specified that we are awaiting input). This window is controlled by the “UI Manager” script.
3) Inventory Window: The inventory window consists of roughly three sections. The item list, where all available items are displayed, the item inspector, where the selected item’s properties are displayed, and the action menu, where all the action buttons are positioned (use, combine, discard etc.). Specific action menu options become available only upon reaching certain conditions. For example, the combine and cancel combination keys are only visible when the combination mode is active, whil the "equip" key is only visible if the selected item can be equipped.
4) Journal Window: This window is governed by the “Note Manager” script as is used to display all the saved notes. Whether a note appears in the journal can be configured via the note manager script.
5) Item Window: This is an item preview window which can be optionally toggled when picking up an item. You can see an example of this in the “General Pick-up” script, where the window is shown when the player picks up the flashlight.
6) Dialogue Window: The dialogue window is positioned at the bottom of the screen and is used to display chains of text (a behavior governed by the “Text Manager” script). This window is a more enriched version of the “Minimal Dialogue Window”. The dialogue window contains a dedicated text field, as well as an image and a name field for the “speaker”, whereas the minimal dialogue window only contains a simple text field. Please do note that both windows are managed by the “Text Manager” script, as mentioned before, and also utilize the same “Linked Text” objects to create chains of text via the latter script (aka, the only difference between the two windows is in their appearance).
7) Confirmation Window, Alert Window, and Quantity Window: These windows are managed by the “Popup Manager” script, and are used to prompt the user for input, or notify the user of a specific happening. You can read more about these windows in the “Scripts” section, under the “Popup Manager” script.
8) Note Window: This window is dedicated to reading “notes” found in the game. This window is handled by the “Note Manager” script, just like the journal window.
Interactable objects
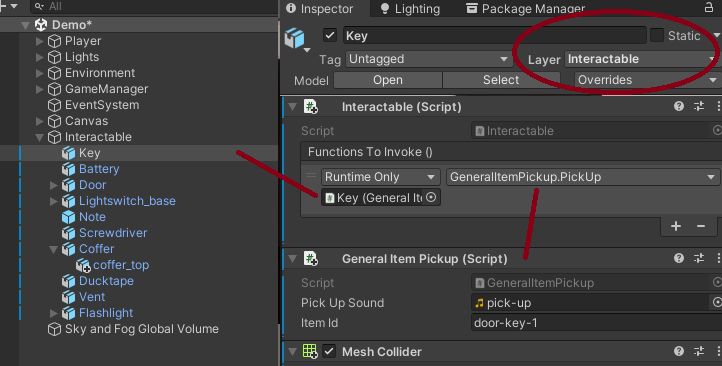
To begin with, we have several interactable items on the scene. Interactable items are game objects that have three main properties. First, these items are assigned under the “interactable” layer in the editor. This allows the raycasting system (inside the cursor manager script), to detect and store these objects whenever the player points the cursor at them. Next, each such object must have the “Interactable” script attached to it. The latter can be configured to invoke specific functions whenever the player attempts to interact with the object. Lastly, most such objects will have a custom “pick-up” script attached to them. These scripts are custom-made for each object, and dictate specific behavior upon the object being picked up. For example, the “Flashlight” object is added to the inventory upon being picked up. As another example, the “Door” object is set up in a similar way, with the only difference being the latter has a dedicated “Door” script attached to it, allowing the player to interact with the door (open and close it).
To recap, making an interactable object requires the following steps:
1) The game object must have a collider and be assigned under the “Interactable layer”.
2) The “Interactable” script must be attached to the object.
3) Optionally, you can attach a custom behavior script to the object.
4) You must assign the functions you wish to invoke in the “Functions To Invoke” field of the “Interactable” script. If you have assigned a custom script, this can be done by dragging the object itself in the script field of the UnityEvent, and then selecting a function from the list of available functions within that script. Please do note that functions must be made public in order for them to be accessed via a UnityEvent field.
Doors, drawers, and movable objects:
The Door and drawer scripts allows us to interact with any object that can alternate between being opened and closed. To utilize these scripts we must first make sure that the scripts are attached to the corresponding objects (like a door or a drawer); alongside the interactable script. For the latter to work, we must also make sure that the object has a collider, and the layer of the object is set to “Interactable”. Lastly, depending on your goal, the interactable script must either call the “Interact” or “Unlock” function of the chosen script. The former is used to open objects that are not supposed to be locked, while the latter is mainly used when the player is supposed to unlock the object first.
Generally, the door script is used on any object which is supposed to be rotated, while the drawer script is used on objects that are supposed to be moved. From now on, we will be taking a closer look at the door script, since the drawer script is indentical to it.
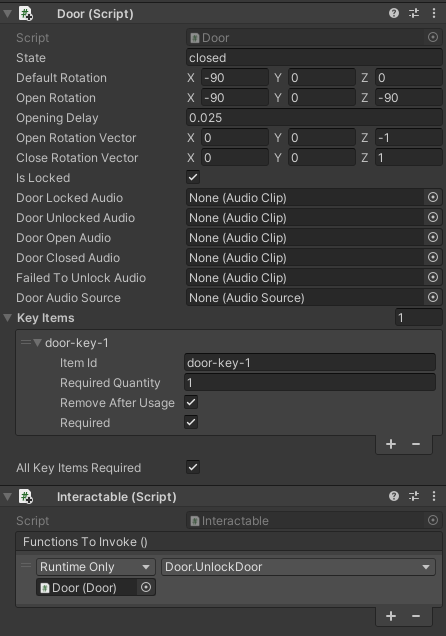
These scripts can be configured to either simply open/close the door/object, or to use items from the inventory as “keys” to unlock it (before we are able to open it). If we look at the door script itself, the configuration is as follows:
1) State: The starting state of the object. If the object is open at start, this variable should be set to “open”, otherwise this variable should be set to “closed”.
2) Default rotation: A vector3 which contains the rotation of the object in its closed state (default implies closed in this context). This rotation is the exact same rotation as you see in the inspector when selecting the 3D object.
3) Open rotation: The rotation of the object in its fully opened state.
4) Opening delay: The delay between animation increments when opening/closing the door/object. The smaller the delay, the faster the animation.
5) Open/Close rotation vector: These vectors are used as increments when animating the object. For example, if the door is open with rotation (0,0,-90), and we wish to close it, we could use a close rotation vector of (0,0,1), meaning that for every opening delay seconds, the door is rotated by (0,0,1). Once the rotation of the door matches the default rotation, the animation will stop and the door will be considered to be closed. The reverse applies for opening the door/object.
Please note that it is crucial that the rotation vector can increment the position of the object in such a way that it reaches the open/default vector when opening/closing. For example, if we are trying to close the door, by, let’s say, reaching the vector (0,0,0) from the initial position of (0,0,-3), we must make sure that by adding the rotation vector, we can indeed reach that value. For example, if the rotation vector is (0,0,5), our function will be running forever since -3 + 5 = 2 (on our z axis), meaning that we will never reach the value of (0,0,0) as our z axis will be infinitely incremented. Similarly, be careful of any decimals. By default, the script rounds up both the current rotation and target vector to only two decimal points, but if the rotation vector (which is not rounded up) has more, this might similarly lead to the function running forever. To sum up, make sure that target vector mod (%) rotation vector = 0, and that the target vector can be reached by incrementing the current rotation by the rotation vector.
This same logic applies for the “Drawer” script (for the corresponding position variables).
6) Is locked: If this boolean is set to true, the door will be considered as locked, and will require a key to be opened (an item from the inventory).
7) Door locked/unlocked audio: The audio played when the door is being clocked or unlocked.
8) Failed to unlock audio: The audio played if the player has failed to unlock the door.
9) Door open/closed audio: The audio played when opening or closing the door.
10) Door audio source: The sound source of the door.
11) Key items: A list of inventory item ids and quantities of those items required to open the door if it is locked.
12) All items required: If this is true, all items will be required to open the door, otherwise ANY of the items from the key list can be used to open the door.
The Drawer script is identical to the door script, but it uses position instead of rotation. Hence it should be used for objects such as drawers.

(Door and drawer scripts, configured to open doors/drawers without unlocking them)
(A door configured to be unlockable with a key)
Player & Movement
The player object consists of the following core components: the collider, the rigidbody, and the camera.
The collider allows the player to get in contact with objects via collisions. Collisions are primarily used by several scripts. First, the "Footsteps" script detects the surface on which the player walks on to determine the ground type. This allows the script to play different sounds based on different surfaces. Meanwhile, the "Door" script ensures that the doors stop their rotation when the player collides with them, providing a more realistic feel. Lastly, trigger zones use colliders to determine whether the player has stepped inside before triggering any related scripts.
The rigidbody is primarily used for jumping. When the player jumps the velocity of the rigidbody is changed in order to propel the player upwards.
Lastly, the camera is used as the "head" of the player. The camera provides vision on the Y axis, allowing the player to look up and down. Additionally, the camera is used to host "spawn points" (which can be configured via the invetory manager script), which allow us to spawn items when the player equips the via the invetory. Of course, spawn points can be any objects on the scene, but in the scope on our demo, the flashlight spawn point exists under the camera object. Lastly, the camera is also parent to the collision detector object, which is used to detect whether there are objects above the player, prohibiting them from standing up from a crouch.
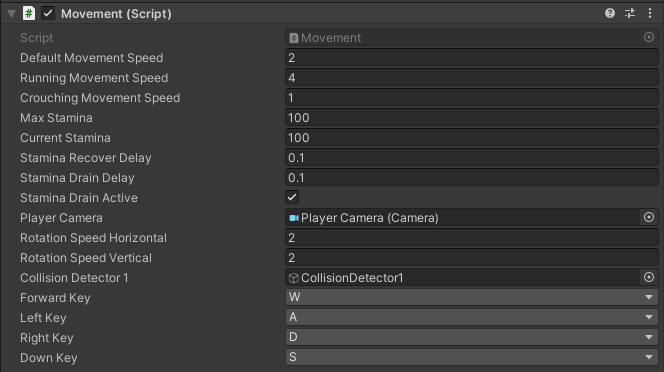
Going back to the primary player object, we can also observe the "Movement" script. The latter is used to allow for player movement using the four primary directions and their combinations. The script works by changing the position of the player object. Depending on the current state of the player (walking, crouching, or running), the player object will move at a different, configurable, speed. Similarly, we can configure not only the speed of movement, but also the speed of rotation on both axis. Lastly, the movement script allows us to configure the rate of stamina drain and recovery.
Whenever the player is running, the stamina is automatically being drained at configurable rate. Similarly, when the player is not running, the stamina is being recovered at a specified rate. Please note that the movement script keeps track of the stamina internaly and manages the ability of the player to run. The display of stamina is handles by the "Stamina Bar Manager" object, which is also attached to the player object.